


Back to Main Quest
Quest Information[]
![]()
|
Description[]
After the release of Narathzul, he decides that now both of you should set off on a quest to recover an ancient artifact of extreme power, the Soul Flayer. The Soul Flayer is the only weapon that can kill a Light-Born.
Walkthrough[]
To the Temple[]
- Barateon's Ambush
As soon as Narathzul Arantheal finishes describing the quest, he starts to take the lead and head for the temple. Suddenly, he becomes attacked by Barateon's Battlemages who automatically become hostile towards you. Having successfully dealt with them, Narathzul will mock Barateon and his futile efforts to stop him from taking his revenge. Barateon's voice responds that Narathzul should be eliminated as he poses a threat to the whole world of Nehrim. After the conversation Narathzul regards using teleport as a safer means of reaching the Temple of the Soul Flayer.
- Into the Temple
Narathzul Arantheal will teleport both of you close to the temple ruins. Follow him while he leads you to the entrance of the temple and enter the Temple of the Soul Flayer (Soul Flayer Temple).
The Temple of the Soul Flayer (level 1)[]
![]()
- Explaining the Tactics
Follow Narathzul as he leads you through the temple. Together with your companion step onto the grated platform and the platform will start to move downwards. Once the platform has reached its destination, Narathzul Arantheal will instruct you about the temple and its structure. Originally, the road to the Hall of the Soul Flayer was designed so that successful entry would require the cooperation of two people. That is why, the road in front of you forks and, consequently, both of you will have to part for the time being. In order to reach the Soul Flayer you need to depend on each other and open each other's way. Thanks to Narathzul's magical abilities he will be able to communicate with you without the necessity of being by your side. You will simply hear his voice.
- Initial instructions
1. Take the right path ( he will take the path on the left)
Narathzul will inform you that he cannot proceed further as his way is blocked by a locked door. He asks you for help in locating a switch that would open the door.
2. Go straight on and step on a pressure plate in front of a closed gate. It will open the gate for Narathzul.
Similarly, Narathzul finds another pressure plate and he steps on it enabling you to move forward, and your gate opens. Enter the room and you will find yourself in a huge chamber.
- Activate the Mechanism


Look up. You will see Narathzul Arantheal on the balcony above, over the purple mechanism. He will inform you that now it is your task to figure out how to activate the mechanism in order to open the next door.
Examine the chamber carefully. You should notice the following things:
- Pressure Plate (fixed to the northern wall)
- 3 purple mechanism ( one with two switches : left, right)
- 2 blue mechanisms
- 1 mechanism in the middle of the room ( the area with lava) with no sphere inside
The easiest way to open the door/activate the mechanism:
1. The Pressure Plate is closest to you, so press it --> look up. A hole in the ceiling will start to form and a purple beam of light will appear.
2. Approach every mechanism with the sphere inside (so not this one in the centre of lava) and activate the spheres (press: Activate) . When the mechanism is activated, the sphere will move upwards. In the end, you should have five raised spheres altogether.
3.Go back to the purple mechanism with two switches (left, right). Pressing the switches operates the beams of light from this sphere.
The easiest order of pressing the switches:
-LEFT- the beam moves to the right and directs at a purple sphere.
Effect: A glowing green sphere appears in the central mechanism (the one surrounded by lava)
-LEFT- the beam aims at the wall.
Effect: Nothing happens.
-LEFT- the beam directs at another purple sphere.
Effect: the green ball raises.
-LEFT- the beam points at the green ball.
Effect: the door at the back of the room opens. Go through this door.
- Take the Large Crystal
Again, Narathzul will be unable to move forwards, as his way is blocked. Go straight and step on a pressure plate (switch) to open the gate for your companion. Go along the tunnel and be careful for there are some traps. Go upstairs and you will be attacked by two Photophobic Creatures which instantly die. When you enter a huge chamber a few spiders will attack you. Kill them and keep to the main road. You will hear Narathzul's voice telling you that the Crystal here looks important and you should take it. Look up. Narathzul is standing on a bridge above you and there is a Large Crystal underneath the bridge. Go to this room and take the Large Crystal. In the meantime, Narathzul will notice a pressure plate which will open the door northwards. Go there.
You will find yourself in a huge chamber infested with spiders. Get rid of them and climb the stairs up. Narathzul will inform you that he also found a Crystal and has taken it. Approach and enter the door to The Temple of the Soul Flayer.
Back to Top
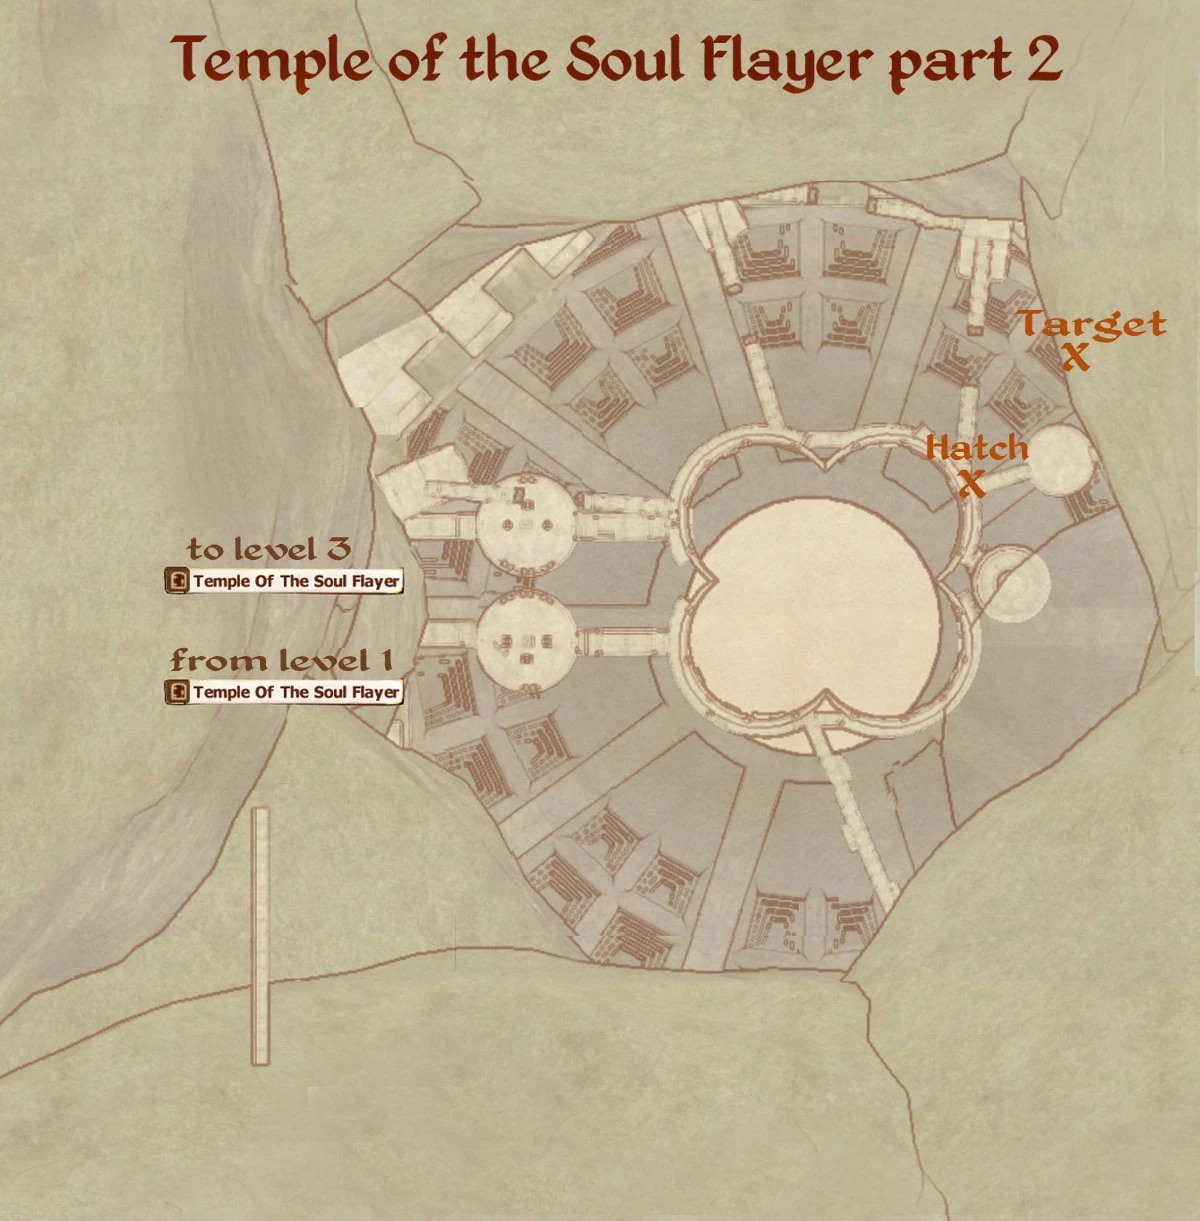
The Temple of the Soul Flayer (level 2)[]
![]()
The Great Cavern[]
The Great Cavern is an area surrounded by lava. In order to go farther you and Narathzul will have to cooperate.
- Step on the pressure plate in front of you --> a bridge for Narathzul will appear. Wait until Narathzul safely goes over the bridge. The bridge will disappear and Narathzul will activate a bridge for you. Go to the other side of the bridge and you will notice another pressure plate.
- Step on the pressure plate --> a bridge for Narathzul will appear on the left. Wait again until Narathzul safely reaches the other part and now he will activate a bridge for you again. Go over the bridge.
Follow the road in the South-East direction, which leads around a circular building. Jump on a circular platform and it will start moving upwards. Leave the platform and move northwards.
The Drawbridges[]
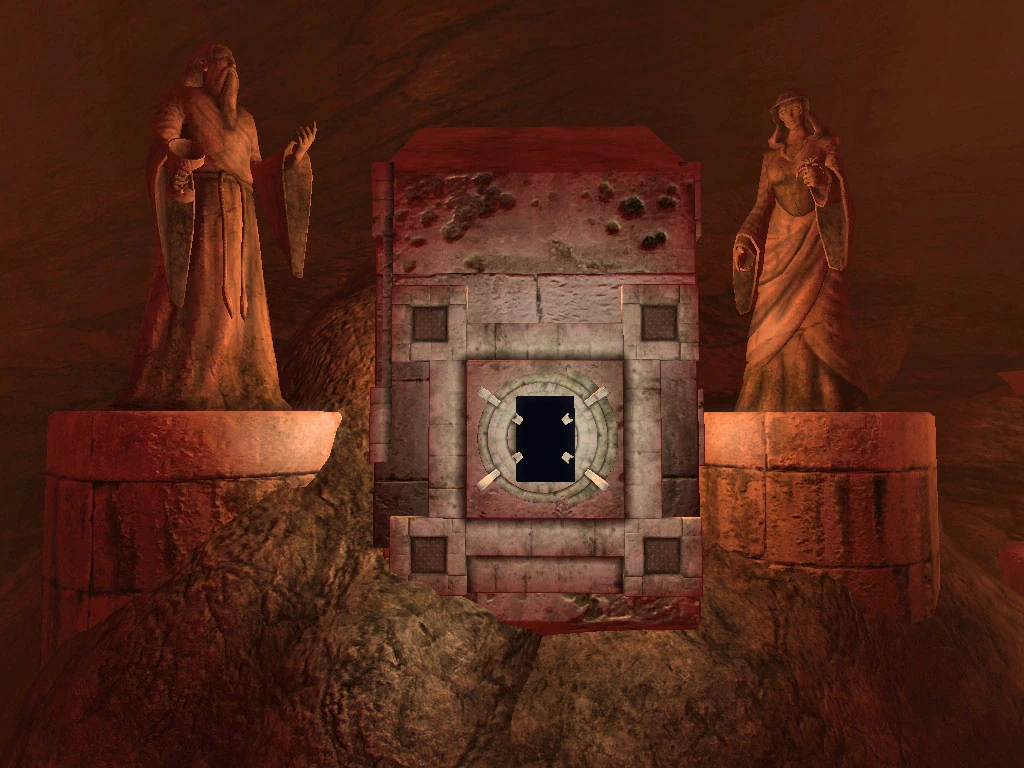

Target
When approaching the drawbridges, Narathzul will inform you about their nature. The bridges are bound to a time switch and you are not fast enough to cross them in time. He advises you to take advantage of the mechanism on the wall, which can be activated by shooting an arrow into the central part of the mechanism. Turn to the east and you will notice a mechanism ( located between two statues). If you do not have a bow and arrows, open the hatch on the western wall ( it contains 2 bows and 20 arrows). Prepare the bow and arrows and start shooting the arrows at the central part of the mechanism. If you successfully activate the mechanism, a bright sphere will be moving in your direction and will probably hurt you. Moreover, Narathzul will tell you that you should hurry. Hide your weapon and rush over the drawbridges to the Magic Portal.
Magic Portal 1[]
Do not click on the Portal (no effect) but simply go through it. It will teleport you to an area with a long narrow bridge with some fireballs hurled at your direction. Avoid the fireballs as they will deal significant damage or outright kill you instantly(see tips). It seems easy to avoid them, as it should be enough to walk on the edge of the bridge instead of the centre. When you have successfully dealt with the fireballs on the bridge, you will encounter a huge spider. Deal with him and head towards the passage that he guarded (placed between two statues).
Magic Portal 2[]
The passage will lead you to another Magic Portal. Narathzul Arantheal will appear in front of you, but you will still be separated. Reach the door to the Temple of the Soul Flayer.
Back to Top
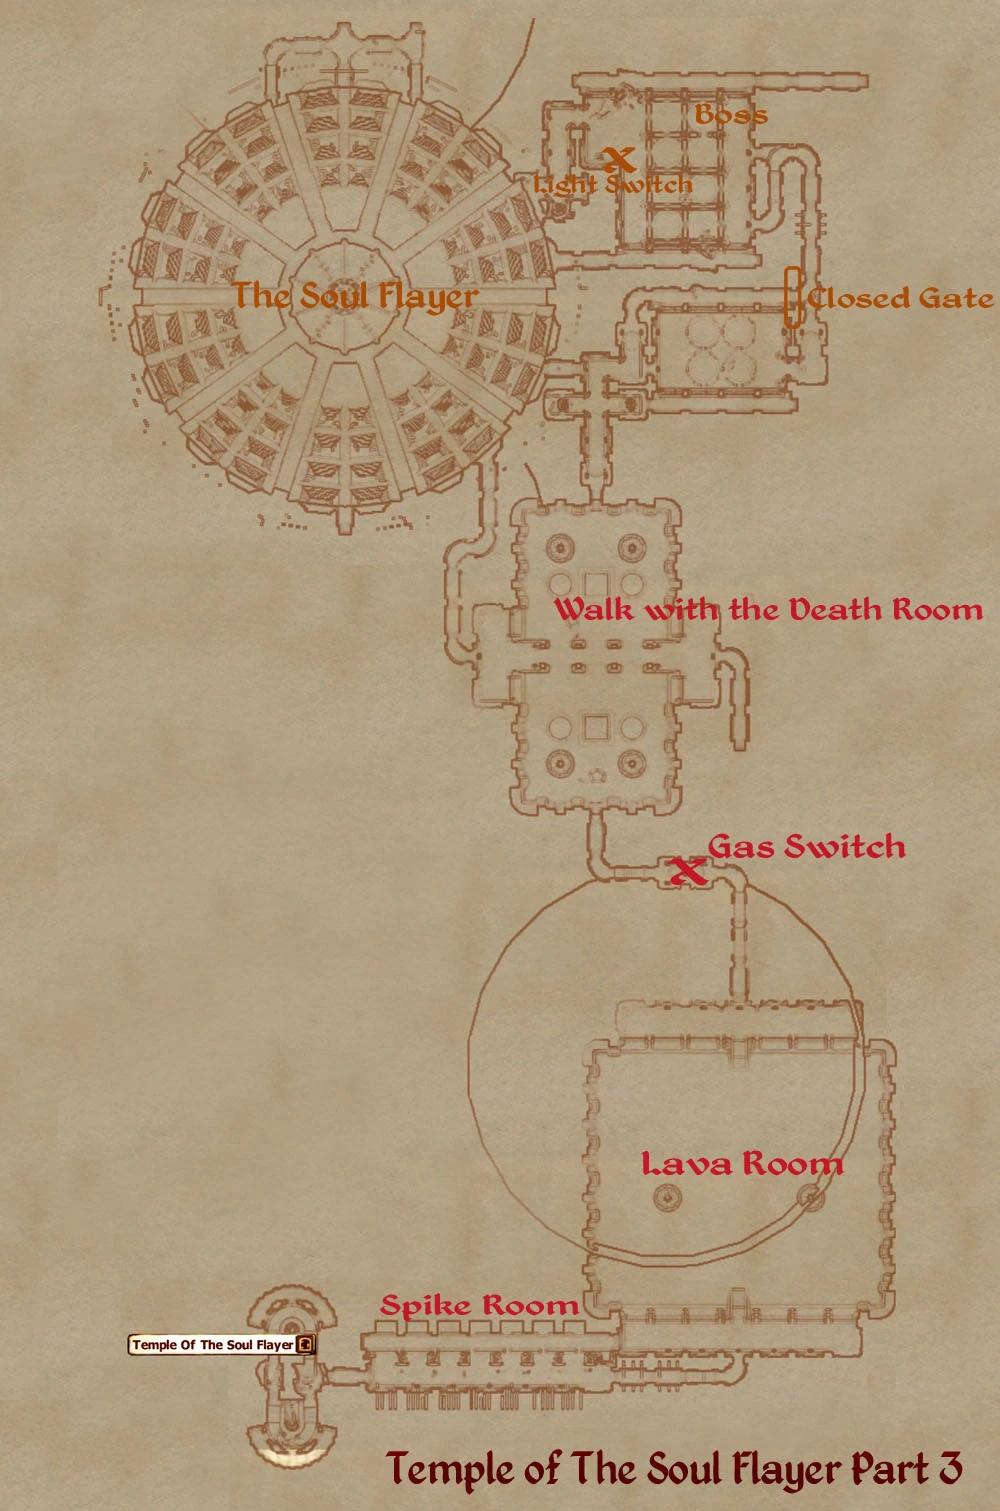
The Temple of the Soul Flayer (level 3)[]
![]()
Deadly Gas[]
- Time Limit
Once you have entered another level of the temple and moved a bit forward, Narathzul will notice that in his chamber deadly gas has started flowing. He urges you to find the switch to the door in his room, otherwise he will suffocate. From now on, you have only 126 seconds to find the switch.
- Traps
Hide your weapon to run faster and jump over some spiders that will try to attack you (dealing with them would be quite time-consuming). After all, the spiders will follow you and probably be killed by traps.
Move in the eastern direction carefully as you will encounter some traps on your way. The first ones are moving walls that can badly squeeze and spike you. Wait patiently here for the wall to move back before going forward to the next one.
In another tunnel you will have to avoid a swinging Iron Blade.
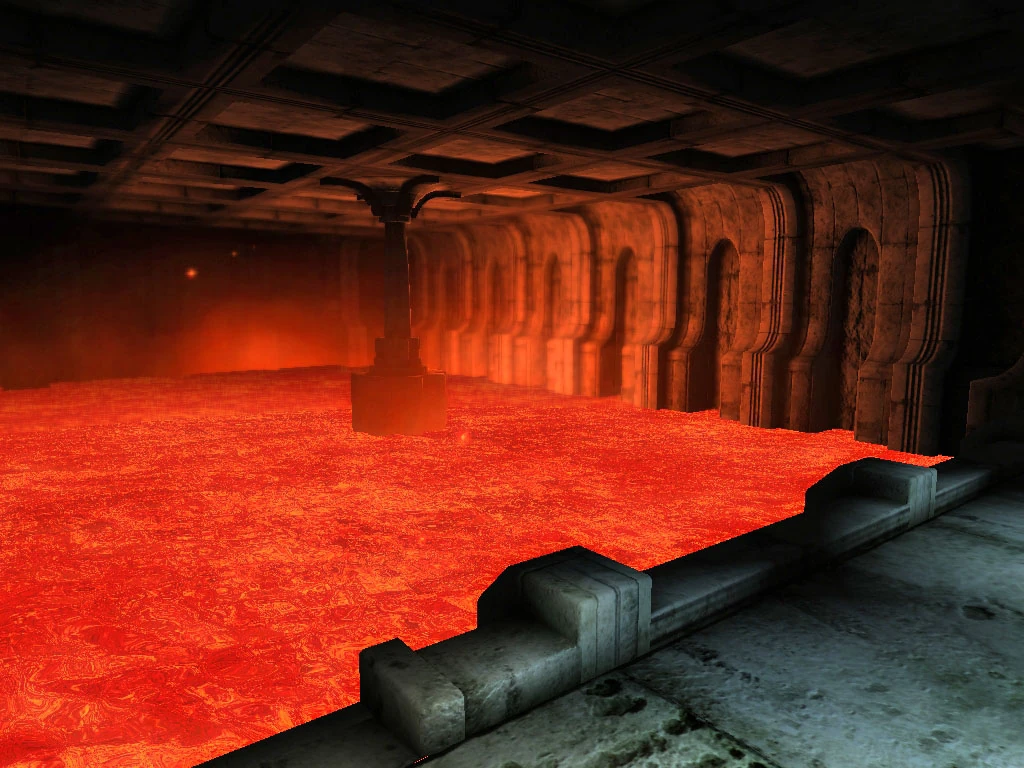
- Lava
When you have managed to avoid the traps you will find yourself in a room which leads to lava. Go north to reach some stairs that seem to go downwards. As soon as you start going down the stairs a brick platform will appear ahead of you. Jump on it and another platform will appear. You have to move quite quickly, as the first platform will start to descend and finally immerse into lava. Your aim is to reach the other side (northern) of the room. If you have high HP and skill with Restoration, it is possible to swim straight through. The platforms will appear in the following order (from the small staircase):

Lava room
-in front of you (N)
-in front of you (N)
-in front of you (N)
-to the left (W)
-to the right (N)
-to the left (W)
-to the right (N)
-to the right (E)
-in front of you (E)
-to the right (S)
-to the left (E)
-in front of you (E)
-to the left (N)
-in front of you (N)
- to the left (W)
-in front of you (W)
Finally, jump on the stairs to the north and follow the main path to find a Gas Switch. Use it. Narathzul Arantheal will state that he has been saved as the door in his room opened and he managed to escape. Go through the tunnel behind the Gas Switch.
Chamber with Magic Traps[]
When you enter another vast chamber Narathzul will tell you to stop as he can detect magical traps set in this room. The traps can be seen only from his point of view ( you can see Narathzul on a bridge to the north). He informs you that the traps are really deadly and one wrong move will take your life. It is of the utmost importance that you listen to him carefully and follow his instructions. Remember about these things before you start following Narathzul's orders:
-Start looking forward (facing the north, Narathzul) and do not look around lest you lose your concentration. (Keep facing the same direction all the time)
-Use A, D to move to the left/right (then you do not need to look around)
-Listen to Narathzul and do not be too hasty in moving or else you will instantly die. Move slowly but respond to Narathzul's instructions quickly.
Here is the list of Narathzul's instructions:
-go to the left
-go forward
-go to the right
-go backwards
-go to the right
go forward
-go to the right
-go forward (under the bridge)
-go to the left
-go forward
go to the left
-go forward
- go to the right
-go forward ( into a passage)
Narathzul finds a switch and he will open the door in front of you. Enter it. On your way you will be attacked by two spiders. Kill them and move forwards.
Back to Top
Photophobic Creature[]
- Open the Gates
Your way will be blocked by a Gate that requires a key to open it. Look down and you will see Narathzul Arantheal there. Narathzul notices two fixtures and he figures out that the large crystals need to go (you should have found one of them earlier) inside the fixtures. He asks you to give him the Large Crystal. To do so you need to remove a Large Crystal from your inventory (shift+ left mouse button) and use Z to throw/move the crystal to Narathzul ( it is possible to do it through the small holes in the balustrade). When the Crystal falls to the room with Narathzul he picks it up and puts the crystals into the fixtures. As a result, both doors open (the Gate in front of you and one in front of Narathzul) and now you can proceed further.
- Examine the Room
On your way you will come across an Iron Blade and, finally, you will join Narathzul in the same chamber. However, he will be busy repeatedly killing a Photophobic Creature that respawns instantly after being killed. Do not concern yourself with killing the creature as it seems immune to your attacks. You will need to figure out another way of defeating the creature. Examine the room:
-To the west you should find a Gate which needs to be opened with a key.
-Turn left from the Gate- you will notice a blue Switch.
- Press the Switch
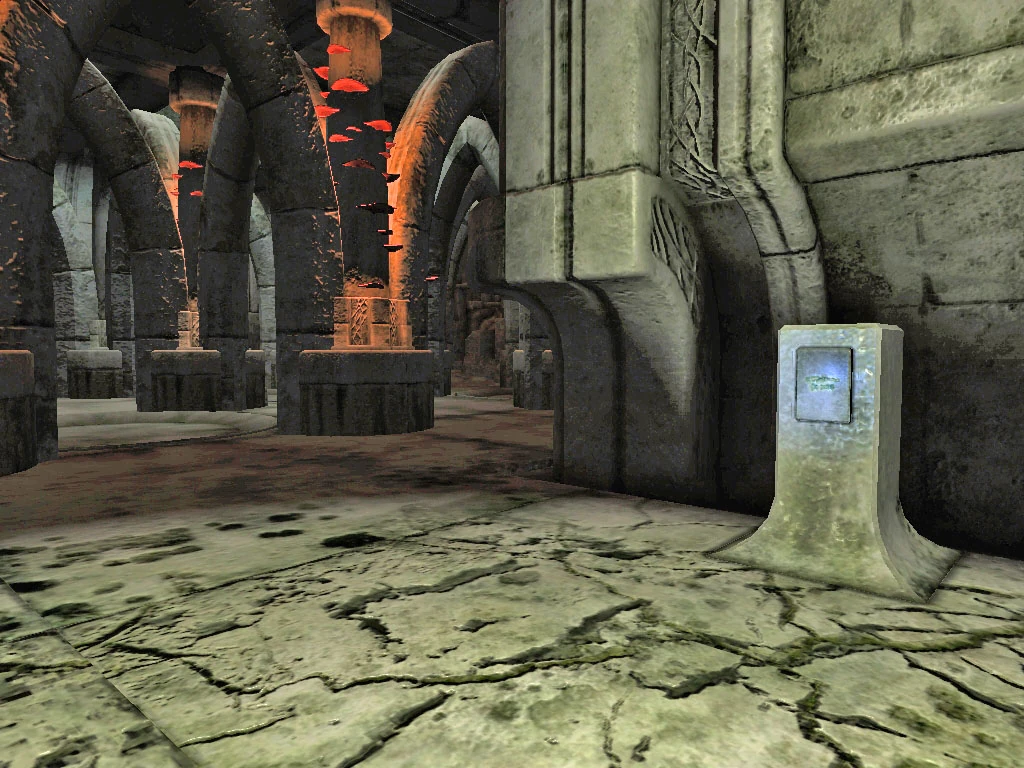

The switch
Press the Switch and you notice that a beam of light will appear somewhere in the centre of the room between the columns. Your aim is to expose this Photophobic Creature to the light. It can be gained in two ways:
- lure the Creature to the stream of light (it might be quite difficult as Narathzul keeps trying to kill him and the beam is active only a few seconds, but, on the other hand, the Creature respawns so quickly that it is actually possible to lure it, especially when you aggro it first, not Narathzul).
- wait until Narathzul fights with the Creature in the area of the beam and try activating the Switch all the time until it hurts the Creature.
- Kill the Creature
When you 'hurt' the Creature with the beam of light it starts burning all the time (you can notice the Creature is in flames). Narathzul will inform you that now it is time to finish the Creature off. The Creature becomes more susceptible to your attacks. You can see its health bar draining with your and Narathzul's attacks. This time when its hitpoints drop, it will actually die.
When you kill the Creature, loot it. You will find the key to the western Gate (Old-fashioned Key). Open the Gate and follow Narathzul as he takes the lead.
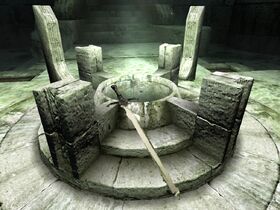
Hall of the Soul Flayer[]

The road to the Soul Flayer is pretty straightforward because you simply have to follow Narathzul's lead. In the Hall you will be encountered by Arkt. Arkt is curious if Narathzul will keep to his word and fulfill what he had begun, that is putting an end to the Light-Born's aristocratic rule over Nehrim. As Narathzul proves determined to follow his plan, Arkt allows him to take the sword and leaves. Narathzul takes the Sword and feels elated to be close to Zelara (her soul trapped in the Soul Flayer) and finally being able to wield a weapon that can kill the Light-Born.
- Immediate plans
Suggest to Narathzul that first of all you must free the besieged Mountain Monastery. Narathzul agrees on the plan and decides that after freeing the Monastery and clearing the Northrealm of Barateon's soldiers they would head for Barateon himself.
Back at the Monastery[]
When the conversation is finished, Narathzul uses a spell that teleports you and him close to the Mountain Monastery.
Back to Top
Maps[]
  |
  |
  |
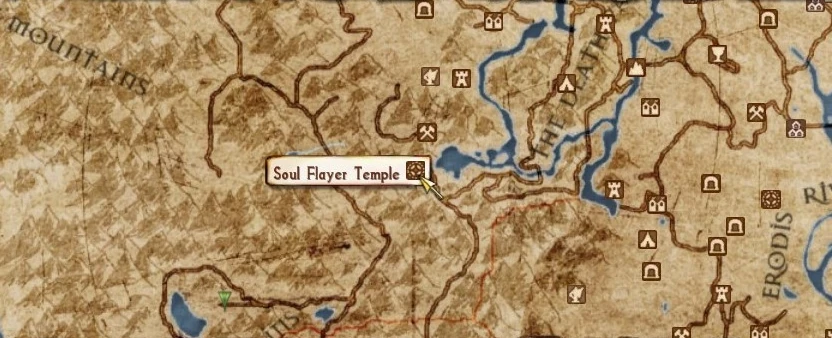  Location |
Tips[]
- Save your game before doing tricky sections in the caverns section! As most of the scripts here only fire once, it will not possible to get back to these areas once the player falls down. This in particular includes the circular platform and the portals. A save reload or console commands must be used to progress.
- It is possible to skip the drawbridges and the fireballs by jumping the wall near where the circular platform reaches its zenith. Doing this will prevent the fireball script from running, as the game expects the player to come from the other side where the portal takes the player.
- The fireballs deal around 400 damage in the non-steam version (not counting any resistances). In the Steam version, they seem to do more damage or kill the player instantly. More testing is needed for verification.
- Waiting (by using the 'wait' command) next to the bridge of fireballs resets the volleys, allowing more time to get to a safer position.
Following Quest[]
Quest Journal[]
The use of the console is same like in Oblivion. Description how to use console commands can be found here
| Soul of the Sword - MQ16 | ||
|---|---|---|
| Stage | End Q | Journal Entry |
| 15 | After I was able to free Arantheal, I found myself back at the grave of a certain Zelara. Arantheal told me how she was his mistress for a long time. At that time he carried out a mission for the Light-Born and was looking for a sword called Soul Flayer. The captain of the Light-Born, Arkt, which I had already talked to in Arktwend, accompanied them. As Zelara began to get closer and closer to Arkt, Arantheal was overwhelmed by anger and he killed her with the Soul Flayer. | |
| 20 | Barateon knows that Arantheal is again free and sent some of his minions. They rushed to attack us. | |
| 31 | We have entered the bowels of the temple. The building is designed so that it takes two to get to the sword - Arantheal will take the left path, I will take the right one. | |
| 115 | End | After we recovered the sword, Arantheal cast a spell that took us to the besieged Mountain Monastery. |
Notes[]
- It is possible to skip the transport inside the temple of the soul flayer by falling down the cracks between it and descending slowly by sticking to the walls to ensure survival. Doing this allows you to take the left path, which skips the puzzles on the first level of the temple. However, Narathzul will also teleport to the next area in the same door that you go through, whereas he is supposed to spawn on the other side of the wall. This halts the quest since Narathzul cannot reach his switches to open the path. It is not possible to jump to the other side since invisible barriers will prevent any attempt to do so. In order to fix this, you must move him to the other side using console commands or reload a save before entering the cavern section.
- It is possible to get to Narathzul’s side from where he normally spawns in this section, although there is nothing of interest. The player must either reload or use console commands to get back to the path.
- After the quest ends, locked gates are placed in the area in the first section where the path splits in two, preventing access to the temple.
Back to Top